general | 8 February 2023
An introduction to creative clipping
The amazingly talented Beverley Eborall shares her top tips on getting creative with your clipping.
Do I need to prep the coat for creative clips?
Yes, the same as you would for everyday clips. You will always get a much better result on clean coats, this way the Adelar Pro can give the precise finish needed for creative clips and sharp lines.
What coat length is best for creative designs?
Whilst designs can be done on any coat, if the hair is too short then you will not see the design as well as you would on a medium-length coat. Long hair can make the more intricate designs harder to achieve but simple designs can still be done easily.
Can I clip pictures if I am not good at drawing?
YES, absolutely! Whilst I do a lot of freehand work, unfortunately, I am not blessed with the skill of being able to draw. For my more intricate work, I create and use my own templates. My daughter is an amazing artist so I either ask her to draw a design for me or I will use images to trace the outline. Using templates gives me a rough outline to follow, I can then sharpen up the design freehand.
How do you make your own templates?
If my daughter is not available to sketch me a design, I will print an image and use that to trace the outline. I buy A4, coloured, plastic envelopes, cut them to size and then cut the image onto these using a craft knife.
How do you define your lines?
Using the Adelar Pro with the shortest cutting length gives me a sharp, precise outline. I will use the clipper blade to cut into the hair placing the cutting edge of the trimmer directly onto the coat, at 90 degrees to the skin. I often hold the trimmer like a pencil and using the outer corner of the blade, this can create things like the eyes on gingerbread men or the inside of lettering.
When creating a full-body design, how do you get ideas for the clip?
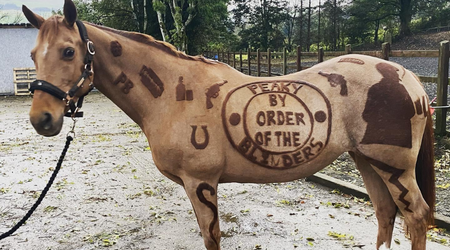
After deciding on a design, I will research ideas and look at pictures online. As I make my own templates for the more detailed designs, I can pretty much adapt any ideas into a clip design. I spend a long time searching through the internet for content to create, this can be months in preparation, my Peaky Blinders clip was a work in progress for nearly a year.
How do you know what the full design will look like/ work once on the horse?
I use a printed outline of a horse to roughly sketch ideas to see how I can put the different lettering/ pictures together. There are always last-minute additions/ adjustments on the day and prior to the actual clip, I am always tweaking the design. I like to be organised in my design and not just throw ideas around on the day, there is so much behind-the-scenes prep involved in full designs.
I will also practice some of the designs on my saint of a pony! Not everything I try will work so if there is any part of the clip I am unsure of, I will do a trial run to see if it will work. I don’t want to find out on the day of a new customer or large design to find out it just isn’t going to work.
On the day I will clearly map my design out using a face paint crayon before I start. This enables me to double-check that everything will fit correctly and that any straight lines are in fact straight!
Do you use any special tools/equipment?
I use Lister Eclipse clippers with a fine blade for removing the bulk of the hair around the design, then the Wahl Adelar Pro for the majority of the detailing work. These trimmers give me a precise outline and can also cut at different lengths to add some dimension to a design. I also use Lister Libretto with an A5 5/8 blade which has a 14mm blade width, allowing me to get into some of the more intricate areas. This blade is great for lettering. I will sometimes use a handheld, hairdressing razor which can also get into those tricky areas.
Top tips for creative designs…
1) Be organised, once you have decided on your design, look at ideas for it online.
2) Make sure your tools are sharp, precision designs need your clippers/trimmers to be freshly sharpened or your lines may not be sharp and defined.
3) You need a cutting blade length that is short. The Wahl Adelar Pro has a shortest cutting length of 0.7mm which is perfect for creative clipping, teamed with the Lister A2 fine blades for removing the bulk around the design are a great combination.
4) Allow plenty of time and take it at your horse’s speed. If they are fidgety or bored, then try another day. I set several days aside for a full design and stop if the horse is getting bored of standing still, you can always try again tomorrow.
5) If your horse is not keen on being clipped or fidgety then consider whether a creative design is the right thing to do. It has to be a nice experience for the horse.
6) Use chalk or a face painting pen to outline your design and make sure it is straight.
7) Stand back regularly to check how it is looking.
8) Circles - I use a face painting pen/ chalk and tie bailing twine around it. Hold the twine at the required length against the skin and use this as the centre of your circle and hold it tight whilst you draw on the horse.
9) Some colours of horse show designs better than others. A grey or black/ dark bay horse will not show as much as a chestnut/ dun/ palomino. The bigger the colour change, the more obvious your design will be.
10) Start simple with hearts/stars and challenge yourself to do more difficult designs, it has taken me years to perfect my designs and I am still always learning.